MySQL 서버 2대를 로드 밸런싱하기 위하여 HAProxy 를 사용해 보기로하였다. 우선, HAProxy 1.4.x 설치를 위하여 haproxy rpm 패키지를 다운로드 받은 후 설치한다.(CentOS 5.x 의 경우 yum 으로 설치시 1.3.x 버전이 설치된다.)
#wget http://repo.nixval.com/nixval-centos/5/updates/haproxy-1.4.9-1.el5.x86_64.rpm
#rpm -ivh haproxy-1.4.9-1.el5.x86_64.rpm
설정 파일을 아래와 같이 수정한다.(MySQL 의 포트가 5000이고, HAProxy 로 연결한 포트는 3306인 경우...)
#vi /etc/haproxy/haproxy.cfg
#---------------------------------------------------------------------
# Example configuration for a possible web application. See the
# full configuration options online.
#
# http://haproxy.1wt.eu/download/1.4/doc/configuration.txt
#
#---------------------------------------------------------------------
#---------------------------------------------------------------------
# Global settings
#---------------------------------------------------------------------
global
# to have these messages end up in /var/log/haproxy.log you will
# need to:
#
# 1) configure syslog to accept network log events. This is done
# by adding the '-r' option to the SYSLOGD_OPTIONS in
# /etc/sysconfig/syslog
#
# 2) configure local2 events to go to the /var/log/haproxy.log
# file. A line like the following can be added to
# /etc/sysconfig/syslog
#
# local2.* /var/log/haproxy.log
#
log 127.0.0.1 local2
chroot /var/lib/haproxy
pidfile /var/run/haproxy.pid
maxconn 4000
user haproxy
group haproxy
daemon
# turn on stats unix socket
stats socket /var/lib/haproxy/stats
#---------------------------------------------------------------------
# common defaults that all the 'listen' and 'backend' sections will
# use if not designated in their block
#---------------------------------------------------------------------
defaults
# mode http
log global
option tcplog
option dontlognull
# option http-server-close
# option forwardfor except 127.0.0.0/8
option redispatch
retries 3
# timeout http-request 10s
timeout queue 1m
timeout connect 10s
timeout client 1m
timeout server 1m
# timeout http-keep-alive 10s
timeout check 10s
maxconn 3000
#---------------------------------------------------------------------
# main frontend which proxys to the backends
#---------------------------------------------------------------------
#frontend main *:5000
# acl url_static path_beg -i /static /images /javascript /stylesheets
# acl url_static path_end -i .jpg .gif .png .css .js
# use_backend static if url_static
# default_backend app
#---------------------------------------------------------------------
# static backend for serving up images, stylesheets and such
#---------------------------------------------------------------------
#backend static
# balance roundrobin
# server static 127.0.0.1:4331 check
#---------------------------------------------------------------------
# round robin balancing between the various backends
#---------------------------------------------------------------------
#backend app
# balance roundrobin
# server app1 127.0.0.1:5001 check
# server app2 127.0.0.1:5002 check
# server app3 127.0.0.1:5003 check
# server app4 127.0.0.1:5004 check
listen mysql-cluster 0.0.0.0:3306
mode tcp
balance roundrobin
option mysql-check user haproxy
server sdm-db1 xxx.xxx.xxx.xxx:5000 check
server sdm-db2 xxx.xxx.xxx.xxx:5000 check
(옵션과 관련한 부분은 해당 서버에 알맞게 튜닝하여 설정하도록 한다.)
MySQL 서버에, 설정 파일에서 지정한 haproxy 사용자를 추가한다.
mysql>use mysql;
mysql>insert into user (Host, User) values ('haproxy서버의IP', 'haproxy');
mysql>flush privileges;
서비스를 실행한다.
#/etc/rc.d/init.d/haproxy start
정상적으로 동작하는지 확인한다.
#mysql -u아이디 -p비밀번호 -hhaproxy서버IP -e "show variables like 'pid_file' ;"
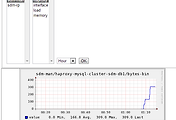
balance 옵션을 roundrobin 으로 두었을 경우, 아래처럼 순차적으로 DB 가 변경되면 된다.

'서버 > 리눅스' 카테고리의 다른 글
| MySQL Cluster 7.1 설치기 - CentOS 5.x (0) | 2013.05.28 |
|---|---|
| collectd Exec 플러그인을 사용하여 HAproxy 모니터링하기 - CentOS (0) | 2013.05.25 |
| phpMyAdmin 설치 및 복수 MySQL 서버 연동 - CentOS 5.x (0) | 2013.05.24 |
| 최신 FFmpeg 설치하기 - CentOS 5.x (0) | 2013.05.21 |
| collectd df 플러그인 사용하기 - CentOS (0) | 2013.05.21 |

댓글